
Image SEO Tips To Best Optimize Images In WordPress
Would you like to learn how to optimize images for SEO in WordPress and increase the amount of search traffic from image searches?
Each day, Google Images receives over 1 billion search requests. Consequently, we’ve compiled a compilation of 17 valuable Image SEO Tips for how to best optimize your images for SEO in WordPress to improve rankings and drive more traffic to your website. These techniques will help improve your website’s search engine ranking and increase the number of visitors it attracts. Additionally, we’ll go over why image SEO is important and how you can use it to benefit your website. Incorporate visuals in the material you produce.
As this is a thorough inventory, there are convenient links available for easy navigation to specific sections.
- Use Descriptive Image File Names
- Write SEO-Friendly Alt Text
- Use Image Caption When Needed
- Consider Your SEO Title and Description
- Disable Attachment Pages
- Define Your Image Dimensions
- Choose the Right Image Format
- Create an Image Sitemap
- Use Image Structured Data to Rank for Rich Snippets
- Add Facebook Thumbnails and Twitter Cards
- Compress Your Images to Reduce File Size
- Lazy Load Your Images
- Use Responsive Images
- Install a Cache Plugin
- Serve Your images Via an Image CDN
- Make Your Website Mobile-Friendly
- Prepare for Google Lens Visual Search
Overall, image SEO involves a multitude of factors that help improve search engine visibility and user experience on your website through optimizing images.
What Is Image SEO?
Image SEO, also known as image optimization, refers to enhancing the images on your webpage with the aim of facilitating Google’s ability to locate and evaluate them for ranking purposes.
To put it differently, it assists Google and other search engines in comprehending your material and displaying your pictures in the outcomes of image searches.
In order to achieve this, you need to improve the quality of your web images, and we will demonstrate how to do so. However, before delving into the process, let’s examine the reasons why incorporating images into your content is essential.
Why Should You Use Images in Your Content?
To begin with, what is the reason behind incorporating images into your content?
Incorporating images in your content is essential as they enrich it and capture the interest of the audience.
By utilizing images properly, it is possible to pick individuals’ curiosity and encourage them to visit your website, thereby enhancing your position in search engine results.
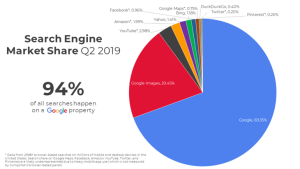
In fact, in 2019 image search represented 20.45% of all searches on Google and other popular sites.
By understanding this, it should become apparent why it is beneficial to use images into your content and optimize them for search engine optimization purposes.
When considering the images you use on your webpage, it is important to consider their relevance to your subject and whether they contribute value to your overall content.
It is advisable to position the significant picture at the beginning of your page and use exclusive pictures that are distinct to your blog or website.
However, there is additional information beyond what has been mentioned.
How to Optimize Your Images in WordPress?
To enhance your rankings and get into Google’s image search, there are additional steps you must take, which we will demonstrate shortly.
Optimizing your images on WordPress can significantly improve your website’s performance by reducing page load times and improving user experience. To optimize your images, you can start by resizing them to a suitable size for your website and compressing them to reduce their file size. You can use plugins such as Smush or ShortPixel to automate the optimization process, or manually compress them using image editing software like Photoshop.
Additionally, it is recommended to use descriptive file names and alt text for each image to improve search engine optimization (SEO) and accessibility for visually impaired users.
In order to enhance the performance of your images in WordPress, it is important to provide extra details regarding them that can help search engines comprehend their content.
Everyday, search engines are becoming more intelligent as they improve their ability to classify and comprehend images. However, they rely on you to give meaning to the image by accurately labeling its file name.
1. Use Descriptive Image File Names
It is recommended to use file names that are descriptive when naming images.
This is the information provided by Google regarding the image file names:

The name of a file can provide hints to Google about what the image depicts. To illustrate, a file named “my-new-black-kitten.jpg” is more descriptive than one called “IMG00023.jpg”.
As an additional illustration, we have a picture of a lively black feline. Rather than labeling it as IMG00021.jpg, we have chosen to name it playful-black-kitten.jpg, which more accurately describes the content of the picture.
It is recommended to provide precise details when naming files. For example, a file named big-eyed-playful-black-kitten.jpg would be preferable over a file simply named black-kitten.jpg.
Also, think of the keywords that users would type in on Google to find your image.
2. Write SEO-Friendly Alt-Text
Alt text, also known as alternative text, plays a key role in optimizing images for SEO. This descriptive text provides insight to Google regarding the content of the image. It is applied as an HTML attribute within the image tag, allowing images to be displayed on web pages.
It can look like this in plain HTML code:
<img src="img_playful-black-kitten.jpg" alt="Playful black kitten" width="500" height="600">As previously stated, the alt text is utilized to provide a description of your image. Even if the image cannot be shown, readers can still comprehend its subject by reviewing the text.
Alt texts have multiple advantages such as aiding people who use screen readers or possess slow internet speeds. Additionally, they can serve as valuable anchor texts when connecting images.
Do not limit your alt text to few words. Rather, visualize yourself describing the picture to a visually impaired individual.
One way to improve the ranking of your image on Google is by using descriptive phrases like “dark chocolate banana bread muffins” instead of just using generic terms like “chocolate”. This will help Google’s algorithms better understand the context of your image based on the alt text, contents of your page, and computer vision capabilities.
Avoid overloading your alt text with various keywords in the hopes of improving your image search ranking. This approach may actually backfire and lead Google to perceive your website as spam.
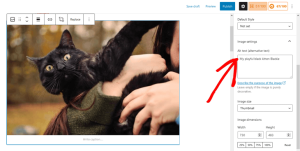
One way to include descriptive text for images in the WordPress Block Editor is by adding Alt Text. This text provides a brief description of the image for individuals who are not able to view the image on the website, such as those who use screen readers. By including Alt Text, website owners can improve accessibility and ensure that all visitors have access to important information on their website.
When using the WordPress block editor, it is very simple to include alternative text to your images.
To add alt text to your image, scroll through the article or webpage you are editing and select the image, putting a blue frame around it. Then navigate to the Image Settings tab located in the editor’s right-hand column and enter your alternate text into the Alt Text field.
Alt texts aren’t visible on your site while captions are shown below your images, which we’ll look at next.
3. Use Image Caption When Needed
Adding captions to your images can help make your content more easily scannable. People often scan through a page looking for headings, images, and captions.
Nevertheless, They can create a disorganized appearance to your content and are not particularly needed because the image is already being described in the text.
Still, captions can be good for:
Family or event photos
Pictures that require further elaboration outlining the underlying context.
And product image galleries
The process of including image captions using the WordPress Block Editor
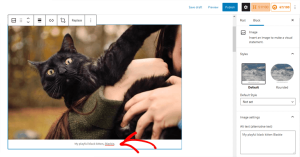
To add your image caption in the WordPress block editor, you simply scroll down in the post or page you’re editing and click on your image, so it gets marked with the blue frame. Next, enter your image caption in the Caption field below the image, and it’s added!
4. Take into account your SEO heading and summary.
When determining which description to display under your image in search results, Google considers the SEO title and description of your page as well.
Here’s what Google says:
Google Images generates a title and description for each search result that best describes the image and how it pertains to what the user searched for. Various sources are used to gather this information, such as relevant descriptive words found in the title and meta tags.
To further clarify, let me provide an instance of the outcome of searching for images on Google using the keywords ‘tasty chocolate muffins’.
All the images below have explanations beneath them. Google relies on the SEO title and description of your page to produce these explanations, which is why it’s crucial for your images to be relevant to the title and description.
5. Disable Attachment Pages
When you upload images to your posts and pages on WordPress, a corresponding page is generated for each image known as the attachment page.
This page merely displays an enlarged version of your image, which can actually harm your SEO. Search engines perceive pages that contain minimal text as having poor quality or “thin content.”
Thankfully, it is simple to turn off the attachment pages on your WordPress website.
6. Define Your Image Dimensions
To ensure optimal performance and SEO, it’s advisable to adjust the size of your images to match the content of your blog page. Despite your website extending to the full width of the screen, the blog section operates within a pre-determined maximum width. Utilizing bigger images could hinder loading speed and adversely impact your site’s search engine rankings.
If your blog’s maximum size is 706 pixels, your images will not be wider than this. If your website is responsive, any images that are larger than 706 pixels will be resized by the browser to fit the screen.
At the very least, this improves the appearance of your website, don’t you agree?
Well, there’s one problem…
When you use big pictures, your browser will still need to load the entire image. This can be a bigger problem if the image is large in file size because it will slow down your page loading time.
This is the reason why it is advisable to resize and upload images in the largest width permissible on your blog or webpage. The good news is that checking this is a simple task.
To begin, access the Web Developer settings in your browser and choose the Inspector tool. From there, position your cursor over the particular column you wish to examine and a black box displaying its dimensions will appear.
You will notice that the blog width of AIOSEO is 706px. Therefore, it is advisable to upload images with a maximum width of 706px to prevent delaying the loading speed of our webpage.
7. Choose the Right Image Format
As previously mentioned, pictures are frequently the reason for your website’s large file size and excessive weight. Due to this, your site may not load quickly enough for visitors to remain interested.
If your website is slow to load, visitors may opt for a different website, resulting in loss of traffic and potential customers. Additionally, this could negatively impact your search engine rankings due to an increase in bounce rate.
The size and quality of your images will vary depending on the format you choose to use when saving them.
The three most dominant types of image files include JPG, PNG and GIF. Each of these serves a specific purpose based on the type of images that you are making or publishing on your website.
When it comes to website graphics with a vast range of color variations, JPG is the most suitable format.
PNG is ideal for situations where you require high-quality graphics and don’t have to worry about file size.
GIF is for animations or moving images
In general, JPG image files have a smaller size compared to both PNG and GIFs. Nonetheless, if you need to maintain high quality for images containing text or graphics, such as screenshots or drawings, then PNG is the better option.
8. Create an Image Sitemap
To accelerate the indexing and crawling of your images by Google, you can make an image sitemap.
By doing so, you will be directed to the main Sitemap interface, where you can observe that the option to Enable Sitemap has been activated.
Ensure that your robots.txt file does not prevent your images from being displayed. You have the option of telling Google not to index your images by disallowing them in robots.txt.
9. Use Image Structured Data to Rank for Rich Snippets
One way to improve your search engine ranking is by utilizing Image Structured Data. This will also help you appear in Rich Snippets, which are visually enhanced search results that provide more information about the webpage.
By incorporating schema markup or structured data onto your website, Google Images has the capability to display your images as rich results that come with a noticeable emblem indicating the essence of your page.
The following illustrates a scenario where Recipe schema markup is incorporated into your website:
The displayed badge containing a fork and knife symbolizes that the content is a recipe. This additional detail can enhance your webpage’s credibility, resulting in a higher CTR (Click-Through-Rate) and increased organic traffic.
Schema markup is supported by Google Images in order to enhance search results.
Products
Videos
Recipes
It is simple to incorporate schema markup into your website and achieve visually attractive rich results with the aid of SEO plugins.
10. Add Facebook Thumbnails and Twitter Cards
It is recommended to include Facebook thumbnails and Twitter cards to your website or blog. These small visual elements can add a professional touch and enhance the appearance of social media posts. Facebook’s thumbnails are the images that appear when a link is shared on the platform, while Twitter cards display a preview of the content being shared. Incorporating both can help increase visibility and engagement on social media platforms.
One more technique to increase the number of visitors to your website is by making use of your social media accounts. To start with, it’s important to ensure that appropriate images are displayed when shared on social media platforms.
11. Compress Your Images to Reduce File Size
One way to decrease the size of your files is by compressing the images. This can be done by using a software program which reduces the amount of data in each image without losing too much quality. By doing this, your files will take less time to upload and download and will also save storage space on your device or server.
As previously stated, having a fast website is extremely important for SEO. Google has verified that it impacts rankings on both desktop and mobile devices, as well as when searching for images.
on your website load. This means that if your website loads slowly, it could negatively affect your search engine rankings and ultimately result in a decrease in traffic to your site. Therefore, it’s important to make sure your website is optimized for speed and performance. Images and fonts are loaded in a similar manner.
To enhance the speed of your website, the initial measure is to reduce the size of your images. There are free services available that enable you to do this such as:
TinyPNG for PNG & JPG files
CompressJPEG for JPG files
Optimizilla for PNG & JPG files
Reducing the size of your image file by 70% or more can greatly affect the speed of your website.
12. Lazy Load Your Images
Utilizing lazy loading is beneficial when your website has an abundance of visual and textual information.
Lazy loading enables the images on your webpage to be displayed solely when they are in view, as the user scrolls through your content. As a result, this optimizes the communication between your website and the server, leading to a faster page load time.
This is what Google has to say regarding lazy-loading:
Implementing lazy loading can considerably enhance the loading speed of lengthy webpages featuring multiple pictures positioned below the visible area. This is achieved by loading the images only when they are required, or after the main content has finished rendering.
Guess what…
If you’re using WordPress 5.4 or later versions, your images will be lazy loaded automatically, eliminating the need for a separate plugin.
In case you desire to include lazy loading for other HTML components like iframe videos and background images, there is an option to employ a lazy load plugin such as WP Rocket to enhance the speed of your webpage loading further.
13. Use Responsive Images
The utilization of responsive images permits your website to display a larger and sharper image on your desktop, as well as allow mobile sites to exhibit a close-up image on mobile devices while reducing the image size. This is capable of boosting the page’s loading speed.
You don’t need to be concerned with this matter if you’re utilizing WordPress. After uploading, WordPress will automatically adjust the images to be responsive and display them in various sizes on your website.
If you want to determine the impact of your images on your website speed, you can employ Google’s PageSpeed Insights tool.
14. Install a Cache Plugin
Storing some of the larger files, such as images, on the user’s web browser through browser caching can increase the speed of your website.
A plugin for caching creates a duplicate of your webpage once it’s loaded for the first time, and subsequently delivers this cached version to other visitors.
WP Rocket provides a range of useful instruments such as page caching and preloading to enhance the speed of your website.
15. Serve Your images Via an Image CDN
If you desire to enhance the speed of your website even further, employing an image CDN (Content Delivery Network) would be beneficial.
To enhance the performance of your website, a cached version of your image will be retrieved from the server located nearest to your geographic location. This process helps reduce the number of internet hops required to display your image from its original server, which is your web hosting provider.
16. Make Your Website Mobile-Friendly
You might be wondering about the relevance of this for optimizing images in terms of search engine optimization.
Neglecting mobile SEO can result in a significant setback for your website due to the increased use of mobile devices. Google deems it necessary to optimize websites for mobile display, or else the images will not appear on their search engine. Furthermore, in light of their mobile-first index, Google now prioritizes ranking mobile-friendly sites higher than others.
To ensure that your website is optimized for mobile devices, it is recommended to utilize a WordPress theme that is responsive and adjusts accordingly to various screen sizes.
17. Prepare for Google Lens Visual Search
If you operate an eCommerce store or a restaurant, it is necessary to be ready for the arrival of visual search through Google Lens.
Google Lens is a recent image-recognition technology developed by Google. By holding down on an image within the Android Google app or Chrome browser, users can identify purchasing options for products or meals.
The Google app on iOS will include this function in the near future, therefore it is advisable to begin preparing your images to be suitable for Google Lens.
Now, did this make you feel overwhelmed?
The task is not as difficult as it appears.
If you apply all of these techniques for enhancing your images in WordPress, you will be well on your way.
We trust that this article has provided you with an understanding of the significance of image SEO and tactics to utilize image SEO for better Google Image rankings and increased website traffic.